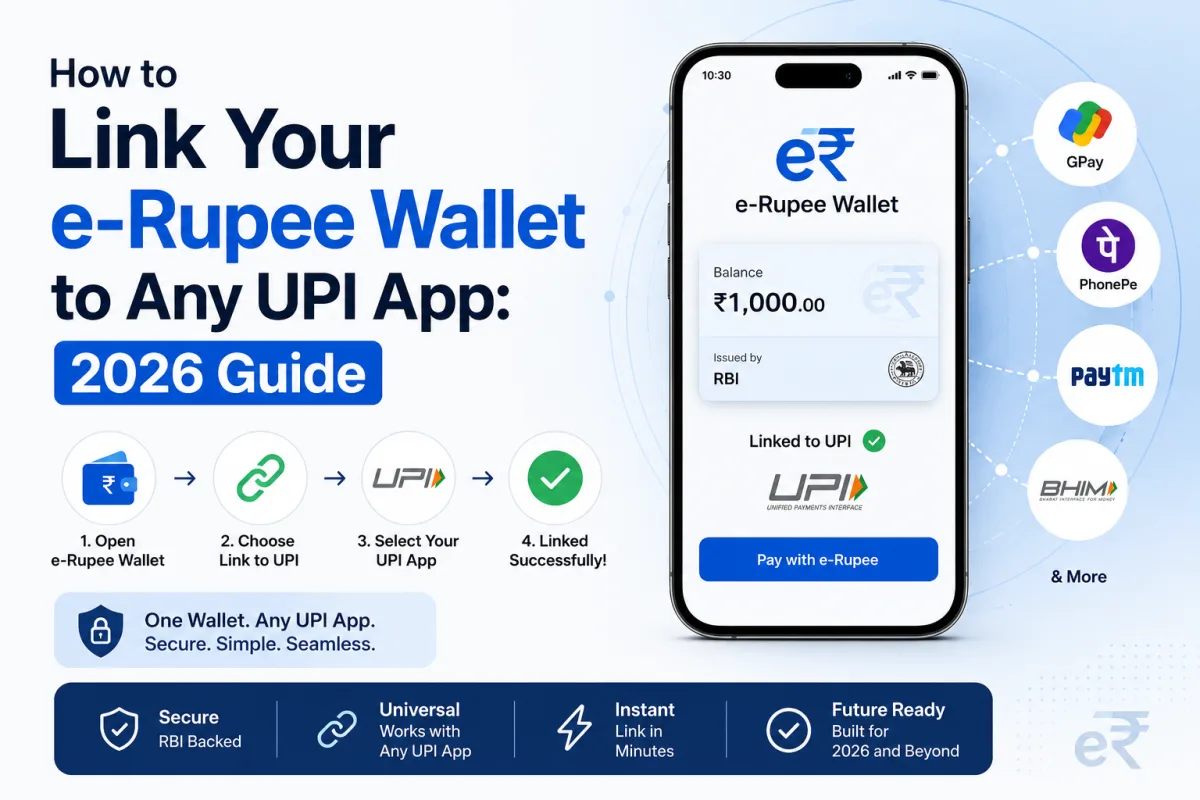
The digital payment system in India changes fast. Just when everyone is comfortable scanning QR codes at local shops, the Reserve Bank of India introduces something new. Right now, many people want to know how to link your e-Rupee wallet to any UPI app. The process is not entirely obvious. You already have a bank account linked to Google Pay or PhonePe. You might wonder why you even need a separate digital currency setup. The short answer is safety and control.
In early 2026, the RBI expanded the digital rupee pilot to over 50 cities. They also fixed the biggest problem with the early versions. You can now use your digital currency to pay at regular merchant QR codes. You do not need to find a shop that explicitly accepts e-Rupee. The systems are now connected. I will walk you through exactly how to set up your wallet, fund it, and connect it to your daily payment apps so you can start using it immediately.
The difference between regular UPI and the digital rupee
Most of us use UPI multiple times a day. When you scan a QR code at a tea stall using PhonePe, you tell your bank to send money directly to the shopkeeper's bank. The money leaves your account and enters theirs. This requires both bank servers to be online and working perfectly.
The e-Rupee is different. It is a Central Bank Digital Currency issued directly by the RBI. Think of it as physical cash stored inside your phone. When you load your wallet, the money leaves your bank account and becomes digital tokens on your device. When you pay a shopkeeper, you hand over those digital tokens. The transaction does not ping your bank's servers again. It just moves the tokens from your phone to their system.
This difference matters for security. We cover many common UPI scams where fraudsters trick people into approving bank transfers. A recent report in Livemint pointed out that the e-Rupee can be a safer way to pay. Because it functions like a prepaid wallet, you can only lose the exact amount you loaded into it. It also features a cooling-off period for large suspicious transactions, giving you a chance to reverse a payment if you realize you made a mistake. Your main bank account balance remains completely isolated from daily merchant transactions.
What you need before setting up your wallet
You cannot just download a generic RBI app to get started. The digital rupee is distributed through specific partner banks. You need an active savings or current account with one of the participating banks. State Bank of India, HDFC, ICICI, Yes Bank, and IDFC First are some of the major players offering this service.
You also need the phone number registered to that bank account active on the phone you are using. The verification system requires sending an SMS from your device. Dual SIM users must ensure they select the correct SIM card during setup. Finally, keep your debit card handy or ensure your Aadhaar number is linked to your bank account, as you will need one of these for the final authentication step.
Step-by-step guide to digital rupee UPI linking
The actual linking process takes about ten minutes if your mobile network is stable. I recommend doing this at home over Wi-Fi rather than while standing at a checkout counter.
- Find the official digital rupee app for your specific bank. Do not search the Play Store or App Store directly. There are fake apps out there. Go to your bank's official website and click their verified download link for the e-Rupee application.
- Open the app and accept the terms and conditions. The app will ask for permission to manage phone calls and SMS. You must allow this so the app can verify your device binding.
- Select the SIM card that is linked to your bank account. The app will send a silent SMS in the background to verify your phone number with the banking network.
- Set up an app PIN or fingerprint lock. This is the security layer that prevents someone who steals your unlocked phone from accessing your digital cash.
- Choose your bank from the list provided on the screen. The app will fetch your bank account details automatically using your verified phone number.
- Authenticate your account linking. You can enter the last six digits of your debit card and the expiry date. Alternatively, you can use your Aadhaar number to verify your identity.
- Set your wallet PIN. This is a six-digit number you will type every time you send money, just like your regular UPI PIN. Make it different from your phone unlock code.
- Load money into your wallet. Tap the load button on the home screen. You will see digital tokens that look exactly like Indian currency notes. Swipe up on the 100 or 500 rupee notes to add them to your cart, then pay for them using your linked bank account.
- Enable the interoperable QR feature in the settings menu of the e-Rupee app. This tells the system you want your digital wallet to be recognizable by standard payment networks.
How to pay merchants using your linked setup
Once your wallet is funded, you have two ways to spend the money. The simplest method is to just open your bank's e-Rupee app and tap the scan button. You can point the camera at any standard PhonePe, Google Pay, or Paytm merchant QR code. The app will read the code, recognize the merchant, and allow you to pay using your digital tokens.
If you prefer to keep using your favorite app, you can use the UPI handles feature. Inside your e-Rupee app profile section, you will find a specific Virtual Payment Address. It usually looks like yourphonenumber@cbdc or something similar depending on the bank. You can enter this VPA into your regular payment app when making a transfer. However, scanning directly from the digital rupee app is far more reliable right now.
Troubleshooting common linking errors
Things do not always work perfectly on the first try. The most common error is the SMS verification failure. If the app gets stuck on the verifying device screen, check your phone's SMS pack. You need an active SMS balance to send the verification text. Unlimited calling plans sometimes lack outgoing SMS benefits, which blocks the setup process completely.
Another frequent issue is the wallet inactive error. If you successfully complete the setup but cannot load money, your bank might require you to complete a fresh KYC process. This usually happens if you have not updated your PAN or Aadhaar details with your home branch in several years. You can often fix this through your bank's primary internet banking portal before trying the digital wallet setup again.
If you face persistent connection errors while trying to scan a merchant code, check if the merchant is using a personal savings account QR rather than a proper merchant account QR. Interoperability works flawlessly with registered business accounts. It sometimes fails if a shopkeeper has printed a personal account QR code and pasted it on their wall. For more basic troubleshooting steps, you can check our digital payment guides section.
The future of the digital rupee ecosystem
The push for the e-Rupee goes beyond simple retail payments. The RBI is testing features like programmable money. This means the government could send digital subsidies to farmers that can only be spent on fertilizer at specific shops. It prevents funds from being diverted for other uses. We are also seeing moves toward offline payments, where you will be able to transfer digital tokens to someone even if neither of you has an internet connection.
The broader goal involves international trade. A recent Reuters report noted that India is proposing to link the digital currencies of BRICS nations. This would allow an Indian business to pay a supplier in another country instantly using digital currency, bypassing the expensive and slow international banking systems that rely on the US dollar. The expansion we are seeing across 50 cities in India right now is the testing ground for these larger ambitions.
For the average user today, the main benefit is keeping your primary bank account hidden and secure. By keeping a small wallet balance in your digital rupee app for daily tea, snacks, and groceries, you protect your main savings from online payment fraud. The setup takes a few minutes, but the added security is worth the effort.
If you run into specific issues not covered here, I highly recommend checking the official RBI FAQ documents or contacting your bank's dedicated digital currency helpline. They have specific teams trained to handle CBDC queries.